Aircrack-ng and WiFi card test

I have been unable to get the Aircrack-ng fragmentation against WEP open authentication to work against my DIR-601 or OpenWRT APs. In reviewing notes, I came across the card-to-card injection test. I thought I would share this in case anyone else is having a similar issue.

For the test, I have two wireless cards/dongles:

  • wlan0mon: Alfa AWUS036NHA
  • wlan1mon: Panda PAU06

For the first test, I am checking the capabilities of the Alfa card.

root@kali:~# aireplay-ng --test -i wlan1mon wlan0mon

12:47:25  Trying broadcast probe requests...
12:47:25  Injection is working!
12:47:26  Found 1 APs

12:47:26  Trying directed probe requests...
12:47:28  B8:A3:86:4C:61:84 - channel: 1 - 'CACTUS'
12:47:29  Ping (min/avg/max): 0.965ms/16.185ms/101.974ms Power: -22.14
12:47:29  29/30:  96%

12:47:29  Trying card-to-card injection...
12:47:29  Attack -0:           OK
12:47:29  Attack -1 (open):    OK
12:47:29  Attack -1 (psk):     OK
12:47:29  Attack -2/-3/-4/-6:  OK
12:47:33  Attack -5/-7:        Failed

Hmmm.  The -5 attack is the fragmentation attack, so it appears that the Alfa AWUS036NHA does not support the attack. Next, I ran the test against the PAU06.

root@kali:~# aireplay-ng --test -i wlan0mon wlan1mon

12:52:26  Trying broadcast probe requests...
12:52:27  Injection is working!
12:52:28  Found 1 APs

12:52:28  Trying directed probe requests...
12:52:29  B8:A3:86:4C:61:84 - channel: 1 - 'CACTUS'
12:52:29  Ping (min/avg/max): 1.612ms/7.339ms/30.850ms Power: -23.07
12:52:29  30/30: 100%

12:52:35  Trying card-to-card injection...
12:52:35  Attack -0:           OK
12:52:36  Attack -1 (open):    OK
12:52:36  Attack -1 (psk):     OK
12:52:36  Attack -2/-3/-4/-6:  OK
12:52:40  Attack -5/-7:        Failed

And the PAU06 also doesn’t appear to support the attack. Hopefully this explains why it is not working. I found an Alfa AWUS036H, which is the card recommended for WiFu, and the card that also seems to work for other with this attack. As soon as it arrives I’ll update this journal with test results.

WEP Configuration for an Wireless AP

Why on earth in 2020 would I be thinking of enabling WEP on a wireless access point (AP)? Well, I’m trying to learn about wireless networks and wireless network security so there is no better way than to dive in, and WEP is the simplest place to start with conceptually.

So, I was learning about airodump-ng, and was puzzled why the output was blank for the authentication (AUTH) field. The man page for the tool says it will state ‘OPN’ for Open authentication and ‘SKA’ for Shared Key authentication.

BSSID             PWR RXQ Beacons #Data,#/s CH MB   ENC CIPHER AUTH ESSID

B8:A3:86:4C:61:84 -52 100      80     0   0  1 54e. WEP WEP         CACTUS

My first thought is always that I messed something up, so I decided to try various configurations for WEP to see if I could get to the bottom of it.

WEP with Open Authentication on a DLINK DIR-601

The DLINK DIR-601 device was extremely frustrating to work with because it was unintuitive and lacked any documentation on wireless configuration. When I tried to configure the AP for WEP, it kept complaining about WPS, which was no where to be seen on the screen for WEP configuration. WPS stands for WiFi Protected Setup, and I still have no idea what it is, but there were various wizards available to use WPS to setup the AP. In the advanced settings I eventually found a checkbox to disable WPS.

In configuring WEP on this AP, there are two options for authentication:

  • Shared Key – allows for 64-bit or 128-bit keys; for a 64-bit key, enter 10 hexadecimal digits, or enter 5 ASCII characters which will be converted to hex when yous save the settings
  • Both – very unintuitive, but the assumed meaning is both shared-key and open authentication, which means

After getting frustrated with google and reading DLINK’s poor documentation, I just tested various settings for security with airodump-ng, and came up with the following results:

DLINK DIR-601
Security Mode
Encryption
(ENC)
Cipher
(CIPHER)
Authentication (AUTH)
None OPN
WEP Both WEP WEP
WEP Shared Key WEP WEP

As expected, both show WEP, buy why is the AUTH mode still blank for WEP Shared Key? There wasn’t much left to do with the Web UI and the config, so I had two choices: Wireshark and PCAP analysis, or try another AP. My brain having been fried from working all day, I went with the latter option first.

WEP with Shared Key Authentication on OpenWRT

The hardest part of OpenWRT is getting it installed on a device, and I’m not going to cover that in this post. Frankly, that is a project all unto its own, fun in its own way, so definitely check it out.  I already have a Xiaomi Mini personal wifi router that I loaded with OpenWRT. However, I have only really used it for a simple desktop switch, and had thoughts of using it in hotels, but I never really had time for that project. I was not sure how to configure it as an AP, let another an AP with WEP.

The good news is that it was so easy I really couldn’t believe it. When OpenWRT is installed it generates an /etc/config/wireless file for your hardware. I just had to open this up and do two things: 1) enable the PHY (option disabled ‘0’), and 2) setup the AP properties for WEP authentication. The WEP settings are under the config section for the wireless interface:

config 'wlan-iface'
....option encryption 'wep+shared'
....option key '1'
....option key1 'DEADBEEF00'
....option channel 'auto'

Multiple keys can be specified for WEP, so I explicitly tell it to use the first key, and set a 10-digit hexadecimal number as the WEP in slot key1.  Not sure if its necessary, but I let OpenWRT use auto mode for channel selection. Finally, for the encryption option, we can select one of the following for WEP:

  • ‘wep’ – this defaults to WEP with open authentication
  • ‘wep+shared’ – WEP with shared key authentication (SKA)
  • ‘wep+open’ – more for clarity, this explicitly says WEP with open authentication

After configuring the device and restarting the networking, I fired up airodump-ng to see the properties of the AP.

BSSID             PWR RXQ Beacons #Data, #/s CH MB   ENC CIPHER AUTH ESSID

F0:B4:29:1B:31:B9 -38 96  8319     0      0  11 54e. WEP WEP         CACTUS2

Yet again, the AUTH field did not have ‘SKA’ field indicating shared key authentication. After some reading, I learned that this field does not populate until a Station authenticates with the AP.  Using another device I authenticated with the AP:

BSSID             PWR RXQ Beacons #Data, #/s CH MB   ENC CIPHER AUTH ESSID

F0:B4:29:1B:31:B9 -40 100 8319   1030   188   2 54e. WEP WEP    SKA  CACTUS2

That looks more like what I was expecting–SKA! I then switched the authenticating device from CACTUS2 (OpenWRT AP) to CACTUS (DLINK DIR-601 AP), which was configured with WEP open authentication:

 BSSID              PWR RXQ Beacons #Data, #/s CH MB   ENC CIPHER AUTH ESSID

 B8:A3:86:4C:61:84  -55 100 1603  227       0  1  54e. WEP WEP    OPN CACTUS

Now I am seeing ‘OPN’ for the open authentication on the AP.  In hindsight, this makes sense, because airodump-ng learns about the features of an AP by monitoring the wireless traffic. The authentication method is not visible in the AP beacon messages.

The final results:

Security Mode Encryption (ENC) Cipher (CIPHER) Authentication (AUTH)
DIR-601 None OPN
DIR-601 WEP Both WEP WEP OPN
DIR-601 WEP Shared Key WEP WEP SKA
OpenWRT wep+open WEP WEP OPN
OpenWRT wep+shared WEP WEP SKA

Now I am ready to start working more with the aircrack-ng tool suite!

Linux: Burning an ISO to a DVD disc

Brasero is not working for me in RHEL7 Desktop. I downloaded the latest Kali Linux ISO image and I want to burn the ISO to a DVD. When I put a blank DVD into the drive, Gnome shows the blank DVD on the desktop. But for some reason Brasero cannot see the disc. After trying some troubleshooting hacks, I realized that I’d much rather have a method for working with DVD burning from the command line rather than messing around with Brasero, or having to install k3b. It is Linux after all, there ought to be a simple way to do this from the command line.

DVD Hardware Check

First things first, I wanted to check up on my DVD burner hardware and see if it is recognized. My burner is an SATA device from an older HP desktop from which I recovered it.

# dmesg | less

[ 1.305351] ata1.00: ATAPI: hp DVD-RAM GHA3N, RH07, max UDMA/100
[ 1.305611] ata2.00: configured for UDMA/133

[ 8.861738] scsi 2:0:0:0: CD-ROM hp DVD-RAM GHA3N RH07 PQ: 0 ANSI: 5

I also wanted to see if RHEL7 does anything with creating device files for the burner. Various Linux distributions create a /dev/dvd, /dev/cdwriter, etc.  I know that /dev/sr# is the way Linux handles CD/DVD drives. I only have one device, so it should be /dev/sr0.

# ls -l /dev/sr0
brw-rw—-+ 1 root cdrom 11, 0 Feb 4 09:58 /dev/sr0
# ls -l /dev/cdrom
lrwxrwxrwx. 1 root root 3 Feb 4 09:58 /dev/cdrom -> sr0

RHEL7 creates a symlink /dev/cdrom which points to /dev/sr0.

Media Verification

My next question was whether the blank DVD media could be recognized. It turns out that the dvd+rw-tools package has a tool to help with that. If it is not on your system, for CentOS/RHEL, run “yum install dvd+rw-tools”.

# dvd+rw-mediainfo /dev/cdrom
INQUIRY: [hp ][DVD-RAM GHA3N ][RH07]
GET [CURRENT] CONFIGURATION:
Mounted Media: 1Bh, DVD+R
Media ID: CMC MAG/M01
Current Write Speed: 16.0×1385=22160KB/s
Write Speed #0: 16.0×1385=22160KB/s
Write Speed #1: 8.0×1385=11080KB/s
Write Speed #2: 6.0×1385=8310KB/s
GET [CURRENT] PERFORMANCE:
Write Performance: 6.8×1385=9420KB/s@0 -> 16.0×1385=22160KB/s@2295103
Speed Descriptor#0: 02/2295103 R@16.0×1385=22166KB/s W@16.0×1385=22160KB/s
Speed Descriptor#1: 02/2295103 R@16.0×1385=22166KB/s W@8.0×1385=11080KB/s
Speed Descriptor#2: 02/2295103 R@16.0×1385=22166KB/s W@6.0×1385=8310KB/s
READ DVD STRUCTURE[#0h]:
Media Book Type: 00h, DVD-ROM book [revision 0]
Legacy lead-out at: 2295104*2KB=4700372992
READ DISC INFORMATION:
Disc status: blank
Number of Sessions: 1
State of Last Session: empty
“Next” Track: 1
Number of Tracks: 1
READ TRACK INFORMATION[#1]:
Track State: blank
Track Start Address: 0*2KB
Next Writable Address: 0*2KB
Free Blocks: 2295104*2KB
Track Size: 2295104*2KB
ROM Compatibility LBA: 266544
READ CAPACITY: 0*2048=0

There is lots of output, but the main point is the “Disc status: blank” and “State of Last Session: empty” which verify the disc is readable and empty.

Wodim – Going down the wrong path…maybe?

When searching for command-line tools to burn ISO images, cdrecord came up frequently. In RHEL7, cdrecord is available and is a symlink to /usr/bin/wodim. Before messing with wodim and disc burning, I thought I’d use to tool to make sure it sees my hardware. After all, Brasero did not see the DVD-RAM drive with an empty disc, and perhaps this will be the same.

# /usr/bin/wodim –devices
/usr/bin/wodim: No such file or directory.
Cannot open SCSI driver!
For possible targets try ‘wodim –devices’ or ‘wodim -scanbus’.
For possible transport specifiers try ‘wodim dev=help’.
For IDE/ATAPI devices configuration, see the file README.ATAPI.setup from
the wodim documentation.

Well, that did not look good. Back to google for more help. On some Ubuntu forums it was recommended to manually instruct wodim to use /dev/sr0.

# wodim dev=/dev/cdrom -checkdrive
Device type : Removable CD-ROM
Version : 5
Response Format: 2
Capabilities :
Vendor_info : ‘hp ‘
Identification : ‘DVD-RAM GHA3N ‘
Revision : ‘RH07’
Device seems to be: Generic mmc2 DVD-R/DVD-RW.
Using generic SCSI-3/mmc DVD-R(W) driver (mmc_mdvd).
Driver flags : SWABAUDIO BURNFREE
Supported modes: PACKET SAO

Much better. But as I was searching further, I came across some information about another utility, growisofs. The name does not sound like a disc burner software, but it turns out that the capability was added over the years.

growisofs – the tool I was looking for

So growisofs does not only burn ISO disc images, it can also be used to create DVD data discs (DVD+R discs) that allow for multiple sessions. At the end of the post I will include some samples for doing so. The focus now is burning an ISO image.

To burn an ISO image, first I added the -dry-run flag so that it only simulates writing to disc. Test first! The next flag is the -dvd-compat flag which makes the disc unappendable. This is what we want for an ISO disc image. Next, the -Z option is used to indicate that this should be the initial session on the disc.  Finally, the ISO disc image is specified and is to be written to /dev/cdrom, which is the symlink to /dev/sr0 on my RHEL7 workstation.

# growisofs -dry-run -dvd-compat -Z /dev/cdrom=/root/kali-linux-2017.3-amd64.iso
😦 growisofs is being executed under sudo, aborting!
    See NOTES paragraph in growisofs manual page for further details.

No bueno. Reading the man page has a long explanation for while performing this operation as root is not necessary. Check the man page if you are interested. Trying again with a regular user account. I made the sure the ISO disc image was readable

$ growisofs -dry-run -dvd-compat -Z /dev/cdrom=/root/kali-linux-2017.3-amd64.iso
😦 unable to open64(“/dev/cdrom”,O_RDONLY): Permission denied

Again, no bueno. Well that is just dandy. The tool does not want to be run via sudo or from the root user account, but my regular user account cannot access the DVD-RAM drive. I bet there is a specific user group for that…checking /etc/group yields a “cdrom” group.

$ ls -al /dev/cdrom
lrwxrwxrwx. 1 root root 3 Feb  4 09:58 /dev/cdrom -> sr0
$ ls -al /dev/sr0
brw-rw—-+ 1 root cdrom 11, 0 Feb  4 09:58 /dev/sr0

Yes, cdrom group owns the DVD-RAM drive, so I need to add my user to that group.

$ sudo usermod -aG cdrom bryan
$ groups
bryan wheel cdrom docker

That’s better. Trying again…

$ growisofs -dry-run -dvd-compat -Z /dev/cdrom=/root/kali-linux-2017.3-amd64.iso
Executing ‘builtin_dd if=/root/kali-linux-2017.3-amd64.iso of=/dev/cdrom obs=32k seek=0’

That output looks promising. After taking away the -dry-run option, I hear the drive spin up and start getting to work:

$ growisofs -dvd-compat -Z /dev/cdrom=/root/kali-linux-2017.3-amd64.iso
Executing ‘builtin_dd if=/root/kali-linux-2017.3-amd64.iso of=/dev/cdrom obs=32k seek=0’

/dev/cdrom: “Current Write Speed” is 16.4x1352KBps.
          0/2886402048 ( 0.0%) @0x, remaining ??:?? RBU 100.0% UBU   0.0%
          0/2886402048 ( 0.0%) @0x, remaining ??:?? RBU 100.0% UBU   0.0%
          0/2886402048 ( 0.0%) @0x, remaining ??:?? RBU 100.0% UBU   0.0%
          0/2886402048 ( 0.0%) @0x, remaining ??:?? RBU 100.0% UBU   0.0%
          0/2886402048 ( 0.0%) @0x, remaining ??:?? RBU 100.0% UBU   0.0%
          0/2886402048 ( 0.0%) @0x, remaining ??:?? RBU 100.0% UBU   0.0%
          0/2886402048 ( 0.0%) @0x, remaining ??:?? RBU 100.0% UBU   0.0%
    1114112/2886402048 ( 0.0%) @0.2x, remaining 1294:52 RBU 100.0% UBU   2.9%
   23396352/2886402048 ( 0.8%) @4.8x, remaining 67:18 RBU 100.0% UBU 100.0%
   56688640/2886402048 ( 2.0%) @7.2x, remaining 30:46 RBU 100.0% UBU 100.0%
   90505216/2886402048 ( 3.1%) @7.3x, remaining 20:35 RBU 100.0% UBU 100.0%
  124846080/2886402048 ( 4.3%) @7.4x, remaining 15:51 RBU 100.0% UBU 100.0%
  159744000/2886402048 ( 5.5%) @7.6x, remaining 13:22 RBU 100.0% UBU 100.0%
  195198976/2886402048 ( 6.8%) @7.7x, remaining 11:29 RBU 100.0% UBU 100.0%
  231178240/2886402048 ( 8.0%) @7.8x, remaining 10:08 RBU 100.0% UBU 100.0%
  267714560/2886402048 ( 9.3%) @7.9x, remaining 9:17 RBU 100.0% UBU 100.0%
  304775168/2886402048 (10.6%) @8.0x, remaining 8:28 RBU 100.0% UBU 100.0%
  342360064/2886402048 (11.9%) @8.1x, remaining 7:48 RBU 100.0% UBU 100.0%
  379125760/2886402048 (13.1%) @8.0x, remaining 7:23 RBU 100.0% UBU 100.0%
  415105024/2886402048 (14.4%) @7.8x, remaining 6:56 RBU 100.0% UBU 100.0%
  454262784/2886402048 (15.7%) @8.5x, remaining 6:30 RBU 100.0% UBU 100.0%
  493977600/2886402048 (17.1%) @8.6x, remaining 6:12 RBU 100.0% UBU 100.0%
  534249472/2886402048 (18.5%) @8.7x, remaining 5:52 RBU 100.0% UBU 100.0%
  575045632/2886402048 (19.9%) @8.8x, remaining 5:33 RBU 100.0% UBU 100.0%
  616398848/2886402048 (21.4%) @9.0x, remaining 5:20 RBU  99.8% UBU 100.0%
  658243584/2886402048 (22.8%) @9.1x, remaining 5:04 RBU 100.0% UBU 100.0%
  700678144/2886402048 (24.3%) @9.2x, remaining 4:50 RBU 100.0% UBU 100.0%
  743604224/2886402048 (25.8%) @9.3x, remaining 4:39 RBU 100.0% UBU 100.0%
  787087360/2886402048 (27.3%) @9.4x, remaining 4:26 RBU 100.0% UBU 100.0%
  831094784/2886402048 (28.8%) @9.5x, remaining 4:14 RBU 100.0% UBU 100.0%
  875659264/2886402048 (30.3%) @9.7x, remaining 4:05 RBU  99.8% UBU 100.0%
  920715264/2886402048 (31.9%) @9.8x, remaining 3:54 RBU 100.0% UBU 100.0%
  966361088/2886402048 (33.5%) @9.9x, remaining 3:44 RBU 100.0% UBU 100.0%
1012531200/2886402048 (35.1%) @10.0x, remaining 3:36 RBU 100.0% UBU 100.0%
1059225600/2886402048 (36.7%) @10.1x, remaining 3:27 RBU 100.0% UBU 100.0%
1106444288/2886402048 (38.3%) @10.2x, remaining 3:17 RBU 100.0% UBU 100.0%
1150877696/2886402048 (39.9%) @9.6x, remaining 3:11 RBU 100.0% UBU 100.0%
1197539328/2886402048 (41.5%) @10.1x, remaining 3:03 RBU 100.0% UBU 100.0%
1246363648/2886402048 (43.2%) @10.6x, remaining 2:55 RBU  99.8% UBU 100.0%
1295712256/2886402048 (44.9%) @10.7x, remaining 2:48 RBU 100.0% UBU 100.0%
1345585152/2886402048 (46.6%) @10.8x, remaining 2:40 RBU 100.0% UBU 100.0%
1396015104/2886402048 (48.4%) @10.9x, remaining 2:32 RBU  99.8% UBU 100.0%
1446969344/2886402048 (50.1%) @11.0x, remaining 2:26 RBU 100.0% UBU 100.0%
1498447872/2886402048 (51.9%) @11.2x, remaining 2:18 RBU 100.0% UBU 100.0%
1550516224/2886402048 (53.7%) @11.3x, remaining 2:11 RBU 100.0% UBU 100.0%
1603108864/2886402048 (55.5%) @11.4x, remaining 2:05 RBU 100.0% UBU 100.0%
1656258560/2886402048 (57.4%) @11.5x, remaining 1:58 RBU 100.0% UBU 100.0%
1709932544/2886402048 (59.2%) @11.6x, remaining 1:52 RBU 100.0% UBU 100.0%
1764196352/2886402048 (61.1%) @11.7x, remaining 1:46 RBU 100.0% UBU 100.0%
1818951680/2886402048 (63.0%) @11.9x, remaining 1:39 RBU 100.0% UBU 100.0%
1874231296/2886402048 (64.9%) @12.0x, remaining 1:33 RBU 100.0% UBU 100.0%
1930100736/2886402048 (66.9%) @12.1x, remaining 1:27 RBU 100.0% UBU 100.0%
1986461696/2886402048 (68.8%) @12.2x, remaining 1:21 RBU 100.0% UBU 100.0%
2043412480/2886402048 (70.8%) @12.3x, remaining 1:15 RBU  99.8% UBU 100.0%
2094792704/2886402048 (72.6%) @11.1x, remaining 1:10 RBU 100.0% UBU 100.0%
2152726528/2886402048 (74.6%) @12.5x, remaining 1:04 RBU 100.0% UBU 100.0%
2211217408/2886402048 (76.6%) @12.7x, remaining 0:59 RBU 100.0% UBU  97.1%
2270265344/2886402048 (78.7%) @12.8x, remaining 0:53 RBU  99.8% UBU 100.0%
2329804800/2886402048 (80.7%) @12.9x, remaining 0:47 RBU 100.0% UBU 100.0%
2389901312/2886402048 (82.8%) @13.0x, remaining 0:42 RBU 100.0% UBU 100.0%
2450554880/2886402048 (84.9%) @13.1x, remaining 0:36 RBU 100.0% UBU  97.1%
2511732736/2886402048 (87.0%) @13.2x, remaining 0:31 RBU 100.0% UBU  97.1%
2573467648/2886402048 (89.2%) @13.4x, remaining 0:26 RBU 100.0% UBU  97.1%
2635726848/2886402048 (91.3%) @13.5x, remaining 0:20 RBU 100.0% UBU  97.1%
2698543104/2886402048 (93.5%) @13.6x, remaining 0:15 RBU 100.0% UBU  97.1%
2761883648/2886402048 (95.7%) @13.7x, remaining 0:10 RBU 100.0% UBU  97.1%
2825781248/2886402048 (97.9%) @13.8x, remaining 0:04 RBU 100.0% UBU  97.1%
builtin_dd: 1409376*2KB out @ average 9.1x1352KBps
/dev/cdrom: flushing cache
/dev/cdrom: closing track
/dev/cdrom: closing disc
/dev/cdrom: reloading tray

To verify the disc…

$ dvd+rw-mediainfo /dev/cdrom
INQUIRY:                [hp      ][DVD-RAM GHA3N   ][RH07]
GET [CURRENT] CONFIGURATION:
Mounted Media:         1Bh, DVD+R
Media ID:              CMC MAG/M01
Current Write Speed:   16.0×1385=22160KB/s
Write Speed #0:        16.0×1385=22160KB/s
Write Speed #1:        8.0×1385=11080KB/s
Write Speed #2:        6.0×1385=8310KB/s
Speed Descriptor#0:    02/1409375 R@13.2×1385=18280KB/s W@16.0×1385=22160KB/s
Speed Descriptor#1:    02/1409375 R@13.2×1385=18280KB/s W@8.0×1385=11080KB/s
Speed Descriptor#2:    02/1409375 R@13.2×1385=18280KB/s W@6.0×1385=8310KB/s
READ DVD STRUCTURE[#0h]:
Media Book Type:       00h, DVD-ROM book [revision 0]
Legacy lead-out at:    1409376*2KB=2886402048
READ DISC INFORMATION:
Disc status:           complete
Number of Sessions:    1
State of Last Session: complete
Number of Tracks:      1
READ TRACK INFORMATION[#1]:
Track State:           partial/complete
Track Start Address:   0*2KB
Free Blocks:           0*2KB
Track Size:            1409376*2KB
FABRICATED TOC:
Track#1  :             14@0
Track#AA :             14@1409376
Multi-session Info:    #1@0
READ CAPACITY:          1409376*2048=2886402048

Note “Disc status: complete” and “State of Last Session: complete”.

Mission accomplished! Also, don’t forget to run “yum remove brasero“.

Working with data discs

To create an appendable data disc, for the first time use the below command, which has flags for the Rock-Ridge / Joilet extensions (CD/DVD standards):

# growisofs -Z /dev/cdrom -R -J /data_files

Then, to append more data to the disc:

# growisofs -M /dev/cdrom -R -J /data_files2

And of course when you’re finished and need to give the disc to your coworker:

# eject /dev/sr0

I will have to try this in the future.


Applied FreeBSD: Basic iSCSI

iSCSI is often touted as a low-cost replacement for fibre-channel (FC) Storage Area Networks (SANs). Instead of having to setup a separate fibre-channel network for the SAN, or invest in the infrastructure to run Fibre-Channel over Ethernet (FCoE), iSCSI runs on top of standard TCP/IP. This means that the same network equipment used for routing user data on a network could be utilized for the storage as well. In practice, to get high-levels of performance, it is advised that system designers consider iSCSI Host Bus Adaptors (HBAs) for each iSCSI participating team, and that the network at a minimum have a separate VLAN for iSCSI traffic–or more ideally, have separate physical network.

My disclaimer: this article does not cover any of the above performance enhancements! The systems in this article are setup and configured in a VMWare Workstation virtualized environment so that I don’t have to physically procure all of the hardware just to learn about iSCSI.

This article will cover a very basic setup where a FreeBSD server is configured as an iSCSI Target, and another FreeBSD server is configured as the iSCSI Initiator. The iSCSI Target will export a single disk drive, and the initiator will create a filesystem on this disk and mount it locally. Advanced topics, such as multipath, ZFS storage pools, failover controllers, etc. are not covered.  Please refer to the following documentation on iSCSI for more information:

Now to get started…

iSCSI Target Test Setup

The disk drive which should be shared on the network is /dev/ada0, a 5G SATA disk created in VMWare that I attached to the system before starting it up. With FeeBSD, iSCSI is controled by the ctld daemon, so this needs to be enabled on the system. While at it, why not go ahead and enable it at boot time too?

root@bsdtarget:~ # echo ‘ctld_enable=”YES”‘ >> /etc/rc.conf
root@bsdtarget:~ # service start ctld
Starting iscsid.

The real magic is the /etc/ctl.conf file, which contains all of the information necessary for ctld to share disk drives on the network. Check out the man page for /etc/ctl.conf for more details; below is the configuration file that I created for this test setup. Note that on a system that has never had iSCSI configured, there will be no existing configuration file, so go ahead and create it.

root@bsdtarget:/dev # less /etc/ctl.conf
auth-group test{
chap “iscsitest” “bsdforthewin”
}

portal-group pg0 {
discovery-auth-group no-authentication
listen 192.168.22.128
}

target iqn.2017-02.lab.testing:basictarget {
auth-group no-authentication
portal-group pg0
lun 0 {
path /dev/ada0
size 5G
}
lun 1 {
path /dev/ada1
size 5G
}
}

For this setup, LUN 0 will be used by a FreeBSD iSCSI Initiator. I have LUN 1 configured for experimenting with Windows Server at a later time. Before starting ctld, it is a good idea to make sure that the /etc/ctl.conf file is not readable by all users (ctld will complain). At a later point it might be necessary to add iSCSI authentication for the sessions, and it would not be wise to have all users able to look at the authentication secret password.

root@bsdtarget:~ # chmod 640 /etc/ctl.conf
root@bsdtarget:~ # service start ctld

If there are any syntax errors or warnings, ctld will complain about it on the console. The ctladm tool can be used to query the system for more information, for example:

root@bsdtarget:/dev # ctladm lunlist
(7:0:0/0): <FREEBSD CTLDISK 0001> Fixed Direct Access SPC-4 SCSI device
(7:0:1/1): <FREEBSD CTLDISK 0001> Fixed Direct Access SPC-4 SCSI device
root@bsdtarget:/dev # ctladm devlist
LUN Backend Size (Blocks) BS Serial Number Device ID
0 block 10485760 512 MYSERIAL 0 MYDEVID 0
1 block 10485760 512 MYSERIAL 1 MYDEVID 1


That’s really it for the iSCSI Target configuration. The real effort is in setting up the /etc/ctl.conf file. And for a real production system, there would be more configuration with the exported disks, such as using ZFS shares, RAID-1 mirroring, et cetera.

iSCSI Initiator Test Setup

In order for a FreeBSD host to become an iSCSI Initiator, the iscsd daemon needs to be started. It doesn’t hurt to go ahead and add the instruction to /etc/rc.conf so that iscsid is started when the system comes up.

root@bsdinitiator:~ # echo ‘iscsid_enable=”YES”‘ >> /etc/rc.conf
root@bsdinitiator:~ # service start iscsid
Starting iscsid.

Next, the iSCSI Initiator can manually connect to the iSCSI target using the iscsictl tool. While setting up a new iSCSI session, this is probably the best option. Once you are sure the configuration is correct, add the configuration to the /etc/iscsi.conf file (see man page for this file). For iscsictl, pass the IP address of the target as well as the iSCSI IQN for the session:

root@bsdinitiator:~ # iscsictl -A -p 192.168.22.128 -t iqn.2017-02.lab.testing:basictarget

The command returns silently, but a look at /var/log/messages shows that the remote disk was recognized and is now recognized by the Initiator as /dev/da1.

da1 at iscsi3 bus 0 scbus34 target 0 lun 0
da1: <FREEBSD CTLDISK 0001> Fixed Direct Access SPC-4 SCSI device
da1: Serial Number MYSERIAL 0
da1: 150.000MB/s transfers
da1: Command Queueing enabled
da1: 5120MB (10485760 512 byte sectors)

The iSCSI session connection status can also be verified with iscsictl:

root@bsdinitiator:~ # iscsictl -L
Target name                                                 Target portal          State
iqn.2017-02.lab.testing:basictarget    192.168.22.128       Connected: da1

Once the disk is recognized by the iSCSI Initiator system, it can be configured for use on the Initiator like a regular SCSI/SATA disk attached to the system physically. The commands below create a partition and UFS filesystem on /dev/da1.

root@bsdinitiator:~ # gpart create -s gpt /dev/da1
root@bsdinitiator:~ # gpart add -t freebsd-ufs -l 1m /dev/da1
root@bsdinitiator:~ # newfs -U /dev/da1p1
/dev/da1p1: 5120.0MB (10485688 sectors) block size 32768, fragment size 4096
using 9 cylinder groups of 626.09MB, 20035 blks, 80256 inodes.
with soft updates
super-block backups (for fsck_ffs -b #) at:
192, 1282432, 2564672, 3846912, 5129152, 6411392, 7693632, 8975872, 10258112
root@bsdinitiator:~ # mkdir /iscsi_share
root@bsdinitiator:~ # mount -t ufs -o rw /dev/da1p1 /iscsi_share

If there is already a filesystem resident on the device, it only needs to be mounted after the iSCSI session is connected. Back on the iSCSI Target machine, it is possible to see all of the iSCSI Initiators connected

root@bsdtarget:/dev # ctladm islist
ID   Portal                   Initiator name                                                 Target name
6    192.168.22.136   iqn.1994-09.org.freebsd:bsdinitiator      iqn.2017-02.lab.testing:basictarget

Finally, if for some reason it is necessary to disconnect the system, unmount the filesystem and use iscsictl to disconnect the iSCSI session.

root@bsdinitiator:~ # umount /iscsi_share
root@bsdinitiator:~ # iscsictl -R -t iqn.2017-02.lab.testing:basictarget

There is much more to explore with iSCSI, this is just the very beginning, but it serves a a model and a starting point for this work. More to come in the future!

Update: Windows iSCSI Initiator

I am not a very savvy Windows user, and I am very new to Windows Server. I have just started to learn some of the basics. As such, I thought I’d try setting up a Windows Server 2016 host as an iSCSI Initiator. I won’t go into much detail other than what is required for setting up the iSCSI parts. Go ahead and fire up Server Manager.

initiator1

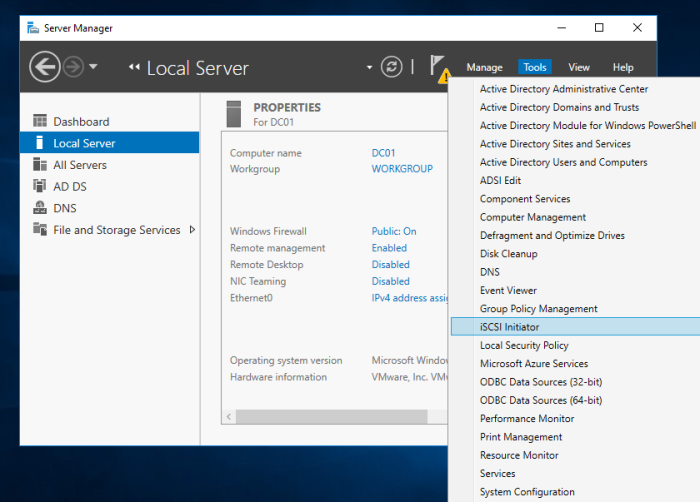
From the “Tools” menu, select iSCSI Initiator. It is also possible to start this application from the Windows search tool by searching for “iSCSI Initiator”. As shown below, when running it for the first time, Microsoft’s iSCSI service may not be running. If not, start it up!initiator2

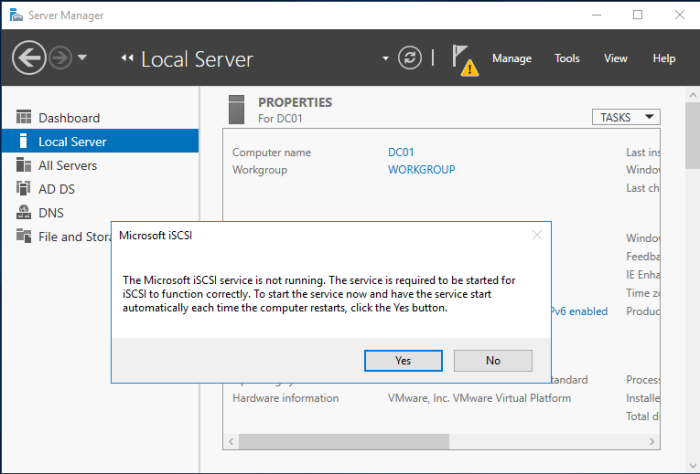
There are many options for configuring the iSCSI Initiator, but for demonstration purposes we’ll cover the basic case. In the Target box, enter the IP address of the iSCSI Target machine and click on the Quick Connect button.

initiator4

A screen should pop-up window finding the IQN for the iSCSI Target service, and it should also state somewhere that the Login was successful.

initiator6

After closing out the pop-up window, the target should now be in the Discovered targets area of the Targets tab.

initiator5

Next go to the Volumes and Devices tab. Unless you know the exact mount point for the iSCSI volume, the best bet is to click the Auto Configure button which will get the data from the iSCSI Target, as shown below.

initiator7

I bet you wouldn’t have memorized that!  Both LUN 0 and LUN 1 are recognized by Windows. Press OK to exit out of the iSCSI Initiator application. Next, open up the Disk Management application on the Windows Server.

initiator8

Notice that two new 5 GB disks are present. The tricky part here is that I am not sure which is LUN 0 and which is LUN 1. My best guess is that the disk that is recognized as a healthy primary partition is LUN 0 which contains a GPT label and is UFS formatted.  Thus the unrecognized disk must be LUN 1, which was not modified by the FreeBSD iSCSI Initiator. In reality I would deploy two iSCSI portal groups, one for the FreeBSD iSCSI Initiators and one for Windows iSCSI Initiators. I might have a third portal group for shared volumes.

For the unrecognized volume, create a MBR partition with the Disk Management tool, and then create a FAT32 partition on this disk as well. I decided to name the partition ISCSI_BSD. As shown below, on this Windows Server, the E: drive is now LUN 1, or /dev/ada2 back on my FreeBSD iSCSI Target machine.

initiator9

The iSCSI drive shows up as a regular drive in Windows Explorer, as shown below.

initiator10

Inside I created a special message for viewing from the FreeBSD side:

initiator11

Finally, it is possible to verify the Windows access using the FreeBSD iSCSI Initiator. Reload the iSCSI Target session data, and now /dev/da2 is available on the FreeBSD Initiator. Even nicer, the FAT32 partitions are recognized by FreeBSD–less work to do! On Windows Server an MBR partition was created, which shows up as /dev/da2p1 in FreeBSD, and the actual FAT32 data partition is /dev/da2p2.

root@bsdinitiator:/iscsi_win_edrive # iscsictl -R -t iqn.2017-02.lab.testing:basictarget
root@bsdinitiator:/iscsi_win_edrive # iscsictl -A -p 192.168.22.128 -t iqn.2017-02.lab.testing:basictarget

root@bsdinitiator:~ # ls -l /dev/da2*
crw-r—– 1 root operator 0x72 Mar 4 22:32 /dev/da2
crw-r—– 1 root operator 0x77 Mar 4 22:32 /dev/da2p1
crw-r—– 1 root operator 0x78 Mar 4 22:32 /dev/da2p2
root@bsdinitiator:~ # mount_msdosfs /dev/da2p2 /iscsi_win_edrive
root@bsdinitiator:~ # cd /iscsi_win_edrive/
root@bsdinitiator:/iscsi_win_edrive # ls
$RECYCLE.BIN hello.txt
System Volume Information
root@bsdinitiator:/iscsi_win_edrive # cat hello.txt
Hello FreeBSD! This is Windows Server!
I made your /dev/ada1 into a FAT32 partition.
I call it E: Drive. Thank you!

It works! I can see the message from Windows land.

Iomega ZIP drives!

I still have my old computer from back when I started at university in 1999! I keep thinking it is time to get rid off the machine, but then again it working just fine.  The only problems with it are that the CD-RW drive is broken and that the Pentium-III consumes a lot of power compared to modern machines. It is a great machine for FreeBSD, however, since all of the hardware is supported by FreeBSD now: wireless NIC, NVidia AGI card, etc.  It also has physical serial ports–two of them!  Last year I installed FreeBSD 10.2, and it has been powered down since. I just got too busy with school work. This morning I came across my stack of Iomega ZIP disks and thought I should see if I still have any data on them. Would my ZIP drive still function after all of this time?

The Iomega ZIP drive was a bid deal for me personally. All of the workstations in the university’s computer science and computer engineering labs had ZIP drives because often our work would not fit on a regular floppy disk. And at this time, there were no USB thumbdrives! I would frequently work in the lab, saving Visual C++ 6.0 projects  or Altera Max-Plus II FPGA projects to my zip disks. I used to carry two around just in case I filled up one disk. I would then continue working at home, taking advantage of the quieter environments to fix my C++ or VHDL code issues. The next day I would take the work I’d accomplished at home and move forward.

Looking back it was really a bit unnecessary though. The school should have prepared a better remote working environment.  The computer science department’s UNIX (Solaris 7 and 8!) network allowed for remote access, so for many of my computer science projects I just worked remotely via ssh on the Solaris machines. But the engineering department didn’t have any remote access capabilities, so I could not use FTP or SCP to transfer work between the engineering network and home. So thus it was the trusty Iomega ZIP disk technology that made my life just that much easier.

When you read about ZIP drives on the Internet, there are lots of complaints about the “click of death” and how unreliable the drives were. I must have been very lucky I suppose. I never had an issue with ZIP drives, and they were extremely reliable. I suppose that the issues was worse for external ZIP drives rather than internal drives. I used zip drives nearly day in and day out for 4 years. Amazingly, the Iomega ZIP drive in my old machine is still working today!

I went through all eight of my disks, and it was a worthwhile experience as I found some old documents and photos. Most of the disks were empty, but one had a bunch of academic papers I had been reading about computational electromagnetics, and another disk had many cover letters and resumes I had written back when I was trying to find a job. I also had some photos from my college days. I got rid of most of the data there, but decided to keep the photos.

In 2003 I purchased a 128 MB USB thumbdrive, and from that time forward I quite using the ZIP drives. The technology now is long dead, and rightly so, USB-based storage is clearly the way to go. But I will alwasy fondly recall the Iomega ZIP disk, much like those before me have memories of 5.25-inch floppy disks. I am going to hold on to these disks for awhile longer. I may keep it around to play around with, but that is about it. After all, I have no where else to transfer the disks to!

Notebook computer for a nerd

I am really struggling with the decision for a new laptop. I really need one, my ASUS X401A is quite challenged by my workload, such as opening more than 8 tabs in chrome, or the battery holding a charge longer than 30 minutes.

I was thinking of getting a MacBook Pro, but the October 2016 product line really left me disappointed. The basic MacBook Pro would have been fine except that there are no USB type-A ports! My Logitech M570 trackball does not come with a USB-C adaptor. Furthermore, my external DVD-RAM drive, USB thumb drives, and USB hard drives are all USB type-A. I suppose one day when the rest of the computer industry has taken the leap of faith and moved away from USB type-A, may then I will switch. But not today. Then I looked at the MacBook Air, and actually it would be ideal, but the screen resolution is very dated and I just feel like for the price that Apple is selling it for, it ought to have a much better display resolution in 2016.  So no Apple this time around…

I have a Dell XPS13 developer edition at work, and I was thinking I would get one for myself at home. I have an older version at work, and the only annoyance is that no matter what I try I cannot disable the trackpad while typing, so the mouse cursor jumps all over the place. Of course at work this is not much of an issue as I use an external mouse at my desk. More disturbing though is that current versions with Kaby Lake Intel processors have an annoying “whine” coming from the power supply. The Dell user forms are full of complains about this, and I am now  going to have to avoid this notebook computer until Dell can determine the fix. It is ashame, because this really would be the ideal machine for me, but I know the whining sound would take its toll.

So where does that leave me? I want a portable ultrabook that I can install Linux on and do some basic software development. I looked at some of the HP and ASUS product lines, but there seem to be issues with Linux and Kaby Lake support on some of these devices. The ASUS device I liked seems to no longer be sold too.  So now I’m looking at Lenovo, the Carbon X1 Thinkpad. I was considering the T460 Thinkpad, but I really want something portable and lightweight.  The X1 has everything I want, except that the it costs so much more to go from a 128GB SSD to a 256GB SSD. Oh and it comes with Windows, so I would have to blow that away.

I am thinking that I will go with the small hard drive in the end though. After all, my Mac Mini is now my primary desktop device, and I do have the NAS on the home network too. What do I need more than 128GB of storage for? Would I even use the additional 128GB, so is it worth an extra $250?

Synology and UPS

By and large I have been happy with the Synology purchase for the home NAS. While I would have had more fun with FreeNAS, my spouse is probably happy I went with the solution that did not require my tinkering or attention here and there frequently. It is also nice to have the Synology apps for iPhone/Android so that we do not have to deal with upload data to the magic cloud.

I did have my first scare with the NAS though, entirely my own fault! At the end of summer there was a power outage that took down everything in the house, including the NAS. I did not have it hooked up to any sort of UPS device at the time, so it went down hard. I could not access it over the network, so I went to look at it, and the Synology NAS just sat there flashing two blue status lights. After doing some google research I was concerned they might be the death indicator lights. I ended up having to pull out the disk drives, remove physical power from the NAS, and then reboot it. After some time the device recovered and I gracefully shut it down, replaced the disk drives, and then rebooted. It came back up, no data lost, and what a relief!

After that scare I decided that I really ought to get a basic UPS for the NAS. I did my homework and found that Synology supports UPS standards that communicate the status of the power supply from the UPS. On Synology’s website is a compatibility list with rather expensive devices and even some dated devices. However, more google research said that any standards-compliant device should work. Of course, being primarily a Linux / Mac user, one could excuse me for balking at that idea when it comes to consumer grade computer equipment!

I really did not need a fancy UPS with lots of features. I just wanted a simple UPS device that will inform the Synology NAS when it switches over to battery. Ideally the UPS would use USB, since EIA-232 Serial Ports are not on Synology devices. I am not looking for a device that will keep a computer running for some amount of time, I simply want to keep the NAS and perhaps a network switch up and running long enough to safely shutdown.

After reading the Wirecutter recommendation for the CyperPower CP685AVR UPS, I searched around some more with google. I did not find any definitive information about Synology NAS devices working with this UPS model, but I decided to take the plunge and see if it would work since my local Microcenter store carries the UPS in stock. I really like the size of the UPS, it is about the size of a small shoe-box or a Cisco Press textbook. It also doesn’t make any noise which is always nice!

Safe Shutdown Test

Before hooking up the NAS to the UPS for power, I decided to try an experiment to make sure the UPS would work with my NAS.

  1. Keep Synology NAS powered by A/C power, but connect the UPS USB cable to the back of the NAS, and power on the UPS
  2. Switch off the UPS outputs only and see how the NAS handles the event.
  3. Switch on the UPS outputs, and then after a minute remove A/C power supply to the UPS
  4. Wait for safe shutdown time, and then confirm the NAS safely powers down.

Configuration

synologyupssettings

Configuration was probably the easiest thing I have ever seen. In the Synology NAS control panel, in the Hardware and Power section, one simply navigates to the UPS tab. Place a check mark in the Enable UPS support box, and then set the safe mode timer. For now I have set this timer to 5 minutes. There is also a button “Device Information” at the bottom of the tab, and as shown in the above screen capture, the NAS automatically detects the UPS.

Test Results

Starting at the bottom and working up with the messages in the screen shot, all of the power events are stored in the NAS log file.  After enabling the UPS support, the NAS logs that the service started and identifies a UPS on the USB port. The message “Local UPS was plugged out” refers to step 2 of my simple test, where I kept the UPS plugged into A/C power but simply disabled the UPS outputs. After 5+ minutes, the NAS was still online and did not shutdown. Next, I re-enabled the power outputs on the UPS, and after a minute or two, removed A/C power from the UPS. The NAS logs that the UPS has gone to “battery” and the safe shutdown timer begins.

synologyupslogs

After the safe shutdown timer expires, the NAS shuts down the Cloud Station service, and logs a message stating it will be going into Safe Shutdown. At this point, keep in mind the NAS is still plugged into A/C power. After the NAS shuts down, the Status LED on the NAS was cleared, and I was no longer able to navigate the NAS via its web interface. I reconnected the UPS to A/C power, and after a minute or two, the blue lights on the NAS began to flicker. A few minutes later, the NAS was back up online and I was able to access to the web interface. Success!

Conclusion

The CyberPower CP685AVR UPS and Synology NAS work just as I had hoped–I could not be happier. I have read that some UPS devices will initiate periodic self-checks than can cause some NAS devices to think power has been lost. I will have to keep an eye out for this, and worst case I may need to extend the safe shutdown timer from 5 minutes to something longer. However, this UPS claims up to 70 minutes on an iMac G4, and I am sure that this NAS with its low-power ARM CPU will not exceed the power draw of an iMac G4. As such, there appears to be plenty of margin to work with.

Home network upgrade: Storage Acquisition

For as long as I can remember I have been dealing with storing files in the following manner: floppy disks, zip drive disks, and now USB hard drives. When I had a Mac computer I actually was very good about regularly backing up my files via ChronoSync and then finally Time Machine. For the past three years I have been without a Mac and just have an old Laptop with Linux and an old desktop with Windows. For these machines, I have been backing up simply by copying files to a USB hard drive. My wife has been using the USB hard drive as well with her Windows laptop  However, over the years we have compiled and saved a lot of photos and videos. The USB hard drives are difficult to organize and manage well among the two of us, and a large volume USB drive is still quite pricey, so we entered the market for a networked storage system where we can save and share files from a central location.

I ruled out Dropbox, Google Drive, and other cloud based solutions as primary storage source. Why? Because I frankly haven’t bought into the cloud yet. For sharing files with people at large, sharing code for school projects, etc., I find such services great. I utilize my Google Drive extensively for school work. However, I’m not quite ready to put tax returns, photos and private data on the cloud yet. For off-site back-up, it is on my to-do list for research and evaluation, but I prefer to keep my primary back-up in my control for the time being. Perhaps when I get a better grip on encryption…

The initial thought was to go for a step-up from a USB hard drive like my Western Digital My Passport and use a Personal Cloud device. Seems simple enough, right? Network connectivity? Check. File sharing? Check. However, last summer at the lab at work a manager came to me with a problem: three HDDs failed in the RAID5 solution purchased from Dell almost a decade ago. I found myself reading more about network storage solutions, which also got me thinking about my home situation. While a personal cloud solves the immediate problem of having a network-based storage, what if it fails? I need RAID!

I then went crazy and dived into the deep end, looking at a FreeNAS build with RAID Z3, SSDs, SAS disks, Xeon CPUs, 64 GB of memory…it started to get expensive quickly, and then I started thinking about the noise of server fans…stop!  I looked at scalding down to RAID Z1, and even just RAID1, but I would still need to build a PC and deal with the configuration and performance tuning. I decided that since I am working full-time, going to graduate school at night, and raising two small kids, that I probably should settle for a canned solution such as a storage appliance rather than something I would need to tune and pay close attention to. When I done with school and have more free time, I still like the idea of building my own FreeNAS system–what a project!

I started looking at Western Digital, Buffalo, Seagate, Drobo, Synology, QNAS, and many others. I narrowed down the decision to the QNAP TS-251 or Synology DS216+ based on reading many reviews, web forum posts, etc. Both units are priced competitively, and in the end I selected the Synology DS216+. With roughly the same technica specifications, it came down to look to the unit and the OS on the device. I would have went with the QNAP if we were to use the NAS for streaming video (the HDMI output is nice), but in reality this storage solution will be used solely for file storage.

I consider this an entry-level purchase since it is a two-drive bay enclosure, and I will configure it for RAID1 with two 3TB Western Digital Red NAS disks. The hope is that it will last me approximately five years, with the plan to upgrade the capacity in three years when the cost of larger hard disks has come down. The DS216+ is powered by a dual-core Intel Celeron rather than a Marvell or ARM solution, so hopefully that will help it keep up with our storage demands. After five years I will take a look at our storage need and consider a higher capacity solution such as 4-drive bay enclosures.

Now that we have a storage solution, I need to figure out the home network connectivity once and for all. We currently access and connect to everything through the Verizon FIOS provided wireless router/AP combo…

Femtocell tear down

Back in 2009 my wife and I bought iPhones. We had just come from Japan where smart phones had not yet penetrated the market, and were curious about the devices. At the time, only AT&T had iPhones, so we had to sign up for the AT&T network. Where we lived, however, we could not get any cellular reception indoor.  In March 2011, with about six months left on our contract, AT&T sent us a femtocell so that we could use our phones in the home. It was free, and we only had to return it if we did not keep AT&T service for two years. It has been 4 years now, so I think it is about time I retire it–with a tear down!

Note: While this device certainly helped with cellular reception, and we could use our phones anywhere in our two-floor townhouse at the time, it was a bandwidth hog on our Internet connection!  We ended up unhooking the femtocell because Skype calls had terrible performance on our regular PCs. When the femtocell was removed, the Skype calls were flawless and picture-perfect. So in the end we did not end up using this device! (In hindsight I wish I would have debugged and troubleshooted the device a bit more, but I just did not have the time.)

The Femtocell

The specific femtocell is actually a product called Cisco’s AT&T Microcell Wireless Cell Signal Booster Tower. I personally was a fan of the design, I thought it was aesthetically pleasing.

femtocell

Let’s get straight to the tear down. After ripping apart the casing, which was not easy to remove, the following circuit board is revealed.

image

The top-left is a digital part of the circuit board. Some sort of device, no doubt some form of a processor, is under the heat sink.  To its left are two Samsung memory chips.  I was not sure what the square IC to the southwest of the processor was.  In the center-top is a Spartan 3 FPGA, and to the right of that is the shielded RF circuitry.  Directly below the heat-sink IC is a bunch of power regulation circuit. At the very bottom is the power input and two Ethernet jacks.  The bottom right side has three ICs, and a shielded IC with a yellow labeling.  Directly below it is the external antenna input. Also in that area are a large circular capacitor and a ceramic device coming off of the circuit board.

image

Close up of the The ceramic device and the capacitor – turns out that the ceramic device is a GPS antenna.

image
I popped the yellow cover off of the shielded IC, and it revealed the above. This circuit is on its own PCB which is mounted to the main PCB, and it has it owns oscillator and other off-chip components.  Finally, following are some close-ups of the large shielded RF circuitry.

image

There are three shielded components.  The top part with three different ICs, the bottom right, with an oscillator, and the bottom left, which an IC that is so small I cannot make it out. It is interesting to note also the two PCB micorstrip antennas feeding into the larger of the shielded areas, which are home to the transmitter and receiver RFICs.

image

A closer look at the transmitter (left) and receiver (right). Note all of the exposed copper and vias! I love RF circuits!

Interesting Parts

  • MAXIM 2597 – UMTS transmitter RFIC: complete with DAC, filters, modulators, Power Ampflier, etc.
  • MAX2557 – UMTS receiver RFIC: ADC, filters, demodulation, etc.
  • HFIO20190630 – ???
  • Picochip PC202 Picoarray – multicore digital signal processing chip
  • Samsung K4T51163QG – 512 MB DDR2 SDRAM
  • Spansion GL512P –  512-Mbit Flash memory
  • Ralink RT2150F – Ethernet MAC and 802.11 radio (most likely only the Ethernet MAC is used)
  • MXT102144 – ???
  • Winbond W9812G6JH-6 – 128-Mbit SDRAM
  • SiRF GSC3/LPx – GSM/GPRS and GSM IC
  • SMSC 8700C – Ethernet PHY
  • Xilinx Spartan-3 – FPGA that most likely glues everything together

The most interesting device in this femtocell is the Picochip PC202. The company was as fabless start-up that was bought out a decade ago. A quick search did not turn up any data sheets or processor guides for the PC202. All in all though, a very cool circuit board with lots of capability!

Further Reading on hacking the board: fail0verflow.

My First ASIC

For the first time in the past few years, I’m really having a lot of fun, and I owe it to my ASIC design course.  For a previous homework assignment, I had to modify and customize a simple counter device.  I then had to simulate and find the optimal clock period with Synopsys.  In the next homework assignment, I had generate the back-annotated delays, and then re-simulate, re-synthesize, and finally analyze for power consumption.  Using the Cadence Encounter tool that is available on campus, the result of my efforts is shown below.

My First ASIC - a simple counter


Now I just have to learn how to read what Encounter is showing me (Fence, Guide, Obstruct, etc.) …