iSCSI is often touted as a low-cost replacement for fibre-channel (FC) Storage Area Networks (SANs). Instead of having to setup a separate fibre-channel network for the SAN, or invest in the infrastructure to run Fibre-Channel over Ethernet (FCoE), iSCSI runs on top of standard TCP/IP. This means that the same network equipment used for routing user data on a network could be utilized for the storage as well. In practice, to get high-levels of performance, it is advised that system designers consider iSCSI Host Bus Adaptors (HBAs) for each iSCSI participating team, and that the network at a minimum have a separate VLAN for iSCSI traffic–or more ideally, have separate physical network.
My disclaimer: this article does not cover any of the above performance enhancements! The systems in this article are setup and configured in a VMWare Workstation virtualized environment so that I don’t have to physically procure all of the hardware just to learn about iSCSI.
This article will cover a very basic setup where a FreeBSD server is configured as an iSCSI Target, and another FreeBSD server is configured as the iSCSI Initiator. The iSCSI Target will export a single disk drive, and the initiator will create a filesystem on this disk and mount it locally. Advanced topics, such as multipath, ZFS storage pools, failover controllers, etc. are not covered. Please refer to the following documentation on iSCSI for more information:
Now to get started…
iSCSI Target Test Setup
The disk drive which should be shared on the network is /dev/ada0, a 5G SATA disk created in VMWare that I attached to the system before starting it up. With FeeBSD, iSCSI is controled by the ctld daemon, so this needs to be enabled on the system. While at it, why not go ahead and enable it at boot time too?
root@bsdtarget:~ # echo ‘ctld_enable=”YES”‘ >> /etc/rc.conf
root@bsdtarget:~ # service start ctld
Starting iscsid.
The real magic is the /etc/ctl.conf file, which contains all of the information necessary for ctld to share disk drives on the network. Check out the man page for /etc/ctl.conf for more details; below is the configuration file that I created for this test setup. Note that on a system that has never had iSCSI configured, there will be no existing configuration file, so go ahead and create it.
root@bsdtarget:/dev # less /etc/ctl.conf
auth-group test{
chap “iscsitest” “bsdforthewin”
}
portal-group pg0 {
discovery-auth-group no-authentication
listen 192.168.22.128
}
target iqn.2017-02.lab.testing:basictarget {
auth-group no-authentication
portal-group pg0
lun 0 {
path /dev/ada0
size 5G
}
lun 1 {
path /dev/ada1
size 5G
}
}
For this setup, LUN 0 will be used by a FreeBSD iSCSI Initiator. I have LUN 1 configured for experimenting with Windows Server at a later time. Before starting ctld, it is a good idea to make sure that the /etc/ctl.conf file is not readable by all users (ctld will complain). At a later point it might be necessary to add iSCSI authentication for the sessions, and it would not be wise to have all users able to look at the authentication secret password.
root@bsdtarget:~ # chmod 640 /etc/ctl.conf
root@bsdtarget:~ # service start ctld
If there are any syntax errors or warnings, ctld will complain about it on the console. The ctladm tool can be used to query the system for more information, for example:
root@bsdtarget:/dev # ctladm lunlist
(7:0:0/0): <FREEBSD CTLDISK 0001> Fixed Direct Access SPC-4 SCSI device
(7:0:1/1): <FREEBSD CTLDISK 0001> Fixed Direct Access SPC-4 SCSI device
root@bsdtarget:/dev # ctladm devlist
LUN Backend Size (Blocks) BS Serial Number Device ID
0 block 10485760 512 MYSERIAL 0 MYDEVID 0
1 block 10485760 512 MYSERIAL 1 MYDEVID 1
That’s really it for the iSCSI Target configuration. The real effort is in setting up the /etc/ctl.conf file. And for a real production system, there would be more configuration with the exported disks, such as using ZFS shares, RAID-1 mirroring, et cetera.
iSCSI Initiator Test Setup
In order for a FreeBSD host to become an iSCSI Initiator, the iscsd daemon needs to be started. It doesn’t hurt to go ahead and add the instruction to /etc/rc.conf so that iscsid is started when the system comes up.
root@bsdinitiator:~ # echo ‘iscsid_enable=”YES”‘ >> /etc/rc.conf
root@bsdinitiator:~ # service start iscsid
Starting iscsid.
Next, the iSCSI Initiator can manually connect to the iSCSI target using the iscsictl tool. While setting up a new iSCSI session, this is probably the best option. Once you are sure the configuration is correct, add the configuration to the /etc/iscsi.conf file (see man page for this file). For iscsictl, pass the IP address of the target as well as the iSCSI IQN for the session:
root@bsdinitiator:~ # iscsictl -A -p 192.168.22.128 -t iqn.2017-02.lab.testing:basictarget
The command returns silently, but a look at /var/log/messages shows that the remote disk was recognized and is now recognized by the Initiator as /dev/da1.
da1 at iscsi3 bus 0 scbus34 target 0 lun 0
da1: <FREEBSD CTLDISK 0001> Fixed Direct Access SPC-4 SCSI device
da1: Serial Number MYSERIAL 0
da1: 150.000MB/s transfers
da1: Command Queueing enabled
da1: 5120MB (10485760 512 byte sectors)
The iSCSI session connection status can also be verified with iscsictl:
root@bsdinitiator:~ # iscsictl -L
Target name Target portal State
iqn.2017-02.lab.testing:basictarget 192.168.22.128 Connected: da1
Once the disk is recognized by the iSCSI Initiator system, it can be configured for use on the Initiator like a regular SCSI/SATA disk attached to the system physically. The commands below create a partition and UFS filesystem on /dev/da1.
root@bsdinitiator:~ # gpart create -s gpt /dev/da1
root@bsdinitiator:~ # gpart add -t freebsd-ufs -l 1m /dev/da1
root@bsdinitiator:~ # newfs -U /dev/da1p1
/dev/da1p1: 5120.0MB (10485688 sectors) block size 32768, fragment size 4096
using 9 cylinder groups of 626.09MB, 20035 blks, 80256 inodes.
with soft updates
super-block backups (for fsck_ffs -b #) at:
192, 1282432, 2564672, 3846912, 5129152, 6411392, 7693632, 8975872, 10258112
root@bsdinitiator:~ # mkdir /iscsi_share
root@bsdinitiator:~ # mount -t ufs -o rw /dev/da1p1 /iscsi_share
If there is already a filesystem resident on the device, it only needs to be mounted after the iSCSI session is connected. Back on the iSCSI Target machine, it is possible to see all of the iSCSI Initiators connected
root@bsdtarget:/dev # ctladm islist
ID Portal Initiator name Target name
6 192.168.22.136 iqn.1994-09.org.freebsd:bsdinitiator iqn.2017-02.lab.testing:basictarget
Finally, if for some reason it is necessary to disconnect the system, unmount the filesystem and use iscsictl to disconnect the iSCSI session.
root@bsdinitiator:~ # umount /iscsi_share
root@bsdinitiator:~ # iscsictl -R -t iqn.2017-02.lab.testing:basictarget
There is much more to explore with iSCSI, this is just the very beginning, but it serves a a model and a starting point for this work. More to come in the future!
Update: Windows iSCSI Initiator
I am not a very savvy Windows user, and I am very new to Windows Server. I have just started to learn some of the basics. As such, I thought I’d try setting up a Windows Server 2016 host as an iSCSI Initiator. I won’t go into much detail other than what is required for setting up the iSCSI parts. Go ahead and fire up Server Manager.

From the “Tools” menu, select iSCSI Initiator. It is also possible to start this application from the Windows search tool by searching for “iSCSI Initiator”. As shown below, when running it for the first time, Microsoft’s iSCSI service may not be running. If not, start it up!
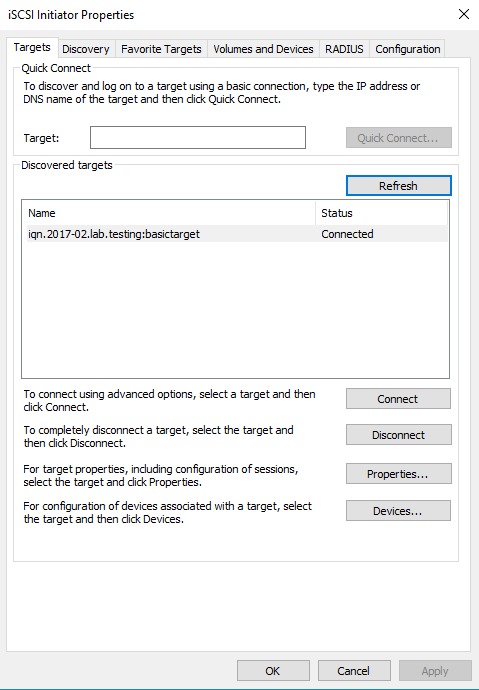
There are many options for configuring the iSCSI Initiator, but for demonstration purposes we’ll cover the basic case. In the Target box, enter the IP address of the iSCSI Target machine and click on the Quick Connect button.

A screen should pop-up window finding the IQN for the iSCSI Target service, and it should also state somewhere that the Login was successful.

After closing out the pop-up window, the target should now be in the Discovered targets area of the Targets tab.

Next go to the Volumes and Devices tab. Unless you know the exact mount point for the iSCSI volume, the best bet is to click the Auto Configure button which will get the data from the iSCSI Target, as shown below.

I bet you wouldn’t have memorized that! Both LUN 0 and LUN 1 are recognized by Windows. Press OK to exit out of the iSCSI Initiator application. Next, open up the Disk Management application on the Windows Server.

Notice that two new 5 GB disks are present. The tricky part here is that I am not sure which is LUN 0 and which is LUN 1. My best guess is that the disk that is recognized as a healthy primary partition is LUN 0 which contains a GPT label and is UFS formatted. Thus the unrecognized disk must be LUN 1, which was not modified by the FreeBSD iSCSI Initiator. In reality I would deploy two iSCSI portal groups, one for the FreeBSD iSCSI Initiators and one for Windows iSCSI Initiators. I might have a third portal group for shared volumes.
For the unrecognized volume, create a MBR partition with the Disk Management tool, and then create a FAT32 partition on this disk as well. I decided to name the partition ISCSI_BSD. As shown below, on this Windows Server, the E: drive is now LUN 1, or /dev/ada2 back on my FreeBSD iSCSI Target machine.

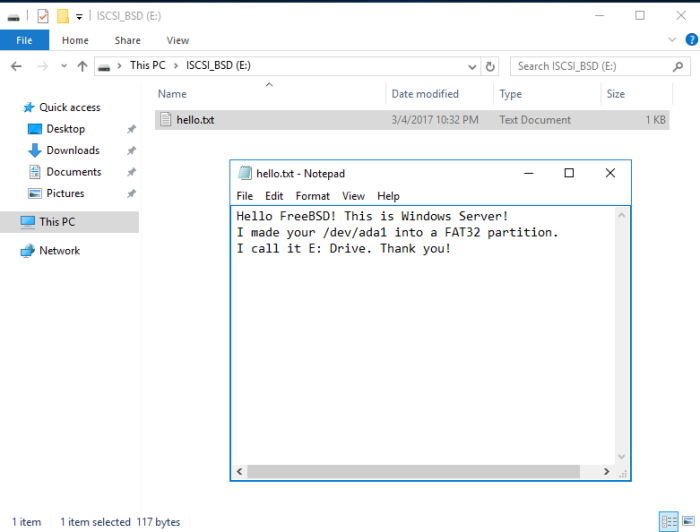
The iSCSI drive shows up as a regular drive in Windows Explorer, as shown below.

Inside I created a special message for viewing from the FreeBSD side:

Finally, it is possible to verify the Windows access using the FreeBSD iSCSI Initiator. Reload the iSCSI Target session data, and now /dev/da2 is available on the FreeBSD Initiator. Even nicer, the FAT32 partitions are recognized by FreeBSD–less work to do! On Windows Server an MBR partition was created, which shows up as /dev/da2p1 in FreeBSD, and the actual FAT32 data partition is /dev/da2p2.
root@bsdinitiator:/iscsi_win_edrive # iscsictl -R -t iqn.2017-02.lab.testing:basictarget
root@bsdinitiator:/iscsi_win_edrive # iscsictl -A -p 192.168.22.128 -t iqn.2017-02.lab.testing:basictarget
root@bsdinitiator:~ # ls -l /dev/da2*
crw-r—– 1 root operator 0x72 Mar 4 22:32 /dev/da2
crw-r—– 1 root operator 0x77 Mar 4 22:32 /dev/da2p1
crw-r—– 1 root operator 0x78 Mar 4 22:32 /dev/da2p2
root@bsdinitiator:~ # mount_msdosfs /dev/da2p2 /iscsi_win_edrive
root@bsdinitiator:~ # cd /iscsi_win_edrive/
root@bsdinitiator:/iscsi_win_edrive # ls
$RECYCLE.BIN hello.txt
System Volume Information
root@bsdinitiator:/iscsi_win_edrive # cat hello.txt
Hello FreeBSD! This is Windows Server!
I made your /dev/ada1 into a FAT32 partition.
I call it E: Drive. Thank you!
It works! I can see the message from Windows land.


